Hello, guys, if you have bought the newly launched Samsung Galaxy A13 smartphone and want to Root Samsung Galaxy A13 with the help of Magisk, then this guide is for you.
In this guide, we have shared the easy ways to root this phone. With the help of this guide, you will be able to Root Samsung Galaxy A13 without any difficulty.
As we know that Samsung has recently launched the Galaxy A13, and users who bought this device are now trying to find a safe way to root Samsung Galaxy A13 on the Google search engine.
Specs Of Samsung Galaxy A13
Samsung has launched its new A-series phone Samsung Galaxy A13. Also, this Galaxy A13 comes with a 6.6-inch FHD+ TFT Infinity-U display, and resolution of this phone’s display (1080 x 2408), and weight is 195 grams.
Samsung Galaxy A13 comes with a MediaTek Dimensity 700 Octa-core chipset and Mali-G57 MC2 GPU, which is a better combination for performance.
Talking about the camera setup of the Samsung Galaxy A13, it comes with a Quad-camera setup on the back, which has a 50-megapixel, a 5-megapixel (ultra wide) lens, then a 2-megapixel macro lens, and then an 2-megapixel depth camera.
The Galaxy A13 is available in Three RAM variants, the first 3GB RAM and 32GB storage, the second 4GB RAM and 64GB internal storage, and third 6GB RAM and 128GB internal storage .
Samsung Galaxy A13 runs on latest One UI 4.1 based on Android 12, and talking about the battery, Galaxy A13 has a 5000 mAh monster battery and it supports 25W fast charging, which is going to give you a lot of battery life.
Before proceeding to this guide, it is important to know What is Root? And what are the advantages and disadvantages of rooting any Android device?

What is Rooting Android?
The root is a process of gaining complete control over Android devices. It is done to get more powerful features on any Android device. By rooting you can downclock or overclock the CPU with the help of third-party apps.
Also, you can change the user interface to the next level by installing custom ROMs, Modules, and much more.
Pros of Rooting Samsung Galaxy A13?
- You can Customize your phone according to your requirements.
- Easily Flash Custom Rom.
- Full control over the smartphone.
- Allows unsupported applications and games to be installed.
Cons of Rooting Samsung Galaxy A13?
- You will lose your Phone Warranty.
- If you apply any wrong steps can brick your phone.
- Your phone will no longer be secure.
Required Files
- Latest Firmware
- Install Samsung USB drivers
- Odin Flash Tool
- Latest Magisk App (Magisk Zip)
Pre-Requisite:
- Fully charge your Samsung Galaxy A13 or at least 75% of battery available. If not, then there is a high risk of being stuck in between the process.
- You will need a PC / laptop to run the ADB command.
- Take Complete backup of android.
- This guide will only work on Samsung Galaxy A13, do not try this guide on any other android device.
Warning! All the Steps/ methods shown in this website are Not tested for every smartphone.
If anything happens to your smartphone, We are Not Responsible For Any Loss or Damage to your Smartphone. So, try these steps with your Own Risk!
Unlock the Bootloader On Samsung Galaxy A13
If you want to install a custom ROM on your smartphone and you are planning to Root Samsung Galaxy A13 device then you must need to unlock your phone bootloader first, Without unlocking Bootloader you cannot Root or Install Custom ROM on this device.
So, let’s know how to Unlock Bootloader On Samsung Galaxy A13
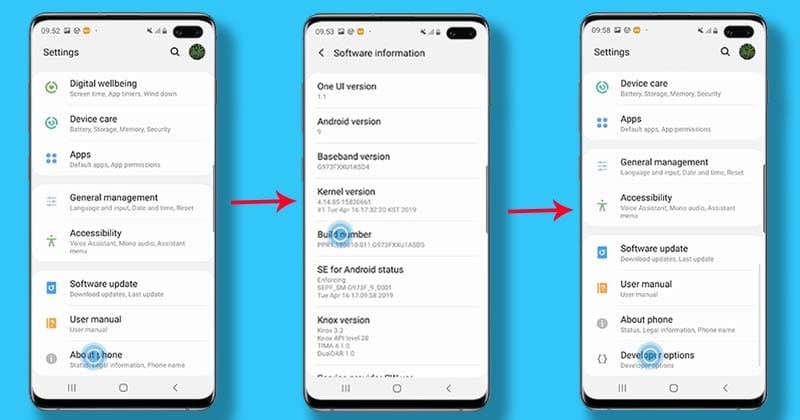
- First, Go to Settings → About Phone → Software information and then tap the Build number 7 times.
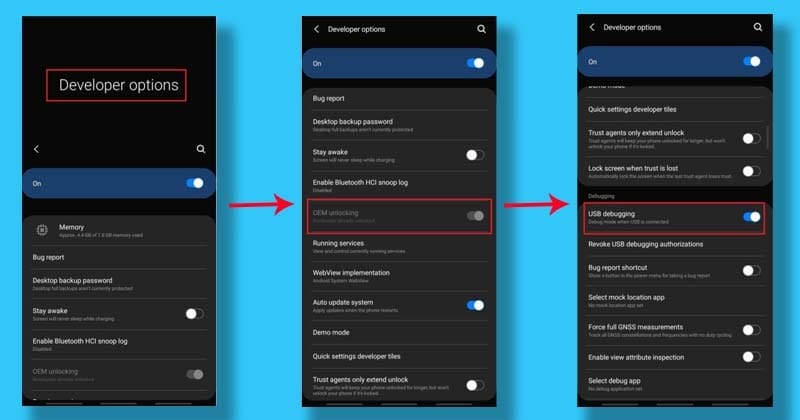
- Now you have to open the settings again, and enable OEM unlock “and” USB debugging “.
To do this (Go to Settings → Developer Options and enable the ”OEM Unlock” and ”USB Debugging”)
- Switch off your phone and connect your device to the PC via the original USB cable.
- Now hold down the Volume UP + Volume Down until you see the warning screen.
- Then press the Volume Up button to boot into download mode.
- Once the device is booted in download mode, long press the Volume Up button, and now the unlock bootloader process will start and it will erase all the data of the phone, so make sure to Backup your Android phone.
- finally, your smartphone will reboot into the system.
Must Read: How To Unlock Bootloader On Samsung Galaxy Phones?
Note: Go to the developers options and check again if the OEM unlock is greyed out, then it means the bootloader is unlocked. If it does not, then wait a few days and try this steps again.
Create a Patch Boot Image Using Magisk App
- You must have already downloaded the firmware file.
- Then Extract the firmware files with 7zip or WinRAR.
- Now copy the “AP” file and then transfer to your internal storage.
- After that, download and install Magisk app Apk.
- Open Magisk Manager app then Tap Install → Install → Select and Patch a File and select the “AP” which file you have earlier transferred to your Samsung Galaxy A13.
- Magisk Manager will start the process of patching the file and the file will be saved as magisk_patched.tar file.
- Once the boot image is patched, then copy the magisk_patched.tar file to your PC.
Flash The Patched Boot Image Using Odin Flash Tool
- First of all, download the latest Odin Flash tool to your PC and extract it.
- Before connecting your Galaxy A13 to PC, open developer mode, then enable USB debugging and OEM unlock option.
I have already explained in the first step how to do it
- Then Boot your Galaxy A13 into download mode
To do this (Press Volume Up button and Volume down button then connect your phone with the PC.
- Now open the Odin tool, then check whether your device is connected or not, if your device is connected, log section will show Added.
- Then Tap on the ”AP” button, and select magisk_patched.tar file
Make sure that “Auto Reboot” is unchecked in options
- Tap on the ”Start” button
This process will take a few minutes and once it is done, you will get a ”PASS” notification, which means is done.
- Now disconnect your phone from PC and Press Volume Up button and Power button at the same time, don’t release keys until you see Bootloader warning screen.
- That’s It 🙂
How to check if Samsung Galaxy A13 has been successfully rooted?
If you want to verify the status of the root on Samsung Galaxy A13 then follow the steps shown below.
- First of all download Root Checker App from Google Play Store.
- Then Open the App → Click “Verify Root”.
- Now, here you will see the message “Congratulations! Root Access is properly installed on this device” if your device has been successfully rooted.
Read Next:
Conclusion:
So, I have shown you the complete Step-by-Step guide on how to Root Samsung Galaxy A13 smartphone. I hope you find this article useful and informative.
If you have any doubts or issues related to this guide, then do let me know in the comment section below. I will try to resolve your problems as soon as possible.
Thank you! for reading this article until the end and don’t forget to share this article with Samsung Galaxy A13 users.
![Download Magisk App 27.0 and Magisk Zip 27.0 [LATEST 2024]](https://www.guidetoroot.com/wp-content/uploads/2020/12/Download-Magisk-Manager-and-Magisk-Zip-Latest-Version-250x150.jpg)


you can just go into download mode and long press voulumeup and instant boot loader unlocked instead of a trash tutortal that doesnt even work on the samsung galaxy a13