Hello friends, welcome to today’s guide, today in this article, I will tell you how to Root Redmi Note 8 Pro.
This guide is very straightforward. You just have to follow the steps carefully. I have shown you a total of 3 ways by which you can easily root your phone without any interruption.
To root your smartphone, you can use any of these three methods shown below. If any method fails, you can try the remaining methods.
I am saying this to you because rooting an Android phone is a complicated process. In such a situation, it is very tough to find out which method will work for your phone.
But you don’t have to worry at all, just you have to follow the methods given below, and you will be able to Root Redmi Note 8 Pro smartphone easily.
About Redmi Note 8 Pro
Redmi Note 8 Pro is the latest budget segment smartphone launched by Xiaomi, and this smartphone comes with very amazing designs and powerful specs.
So let’s talk about the Redmi Note 8 Pro Specs, this phone has a 6.53-inch IPS LCD FHD+ screen with Corning Gorilla Glass 5 display protection, and is powered by a MediaTek Helio G90T (12nm) SOC.
Also, talking about the storage variants of this phone, it comes with four Variants, the first is 6GB RAM/ 64GB internal storage, the second is 6GB RAM/ 128GB internal storage, the third is 8GB RAM/ 128GB storage, and then the fourth variant is 8GB RAM/ 256GB internal storage.
Talking about the camera, Redmi Note 8 Pro comes with Quad camera setup, in which the primary camera is 64-megapixels, then 8-megapixels (ultrawide) camera, then 2-megapixels (macro) camera and then 2-megapixel (depth) camera.
Moving on to the battery, the Redmi Note 8 Pro has a larger 4500 mAh big battery, and supports fast charging 18W, so let’s move on to our guide without wasting any more time
Quick Specs Of Redmi Note 8 Pro
| Display | 6.53 inches IPS LCD capacitive touchscreen Display Resolution: 1080 x 2340 Aspect Ratio: 19:5:9 |
| Processor | Mediatek Helio G90T (12nm) Octa-core 2.05 GHz processor GPU: Mali-G76 MC4 |
| RAM | 6GB/ 8GB |
| Storage | 64GB/ 128GB/ 256GB |
| Rear Camera | Quad: 64MP+ 8MP+ 2MP+ 2MP |
| Front Camera | Single: 20MP |
| Battery | 4500 mAh Li-Po battery 18W Fast charging |
| Operating System | Android 10, MIUI 12 |
What Is Rooting?
Rooting an Android simply means giving your phone a superpower. Once you root your phone, you have full control over your Android System. After rooting your phone, you can install a custom kernel, custom ROM, unlock your phone and remove pre-installed applications.
But before you root your phone, it is very important to know the advantages and disadvantages of rooting an android device.
Advantage Of Rooting The Redmi Note 8 Pro?
Here are some Advantages of Rooting Redmi Note 8 Pro
- After rooting, you can Customize your phone according to your requirements.
- You can Flash Custom Rom.
- Users will have Full Control over the smartphone.
- You can easily Take a Complete Backup of your Android phone.
- This allows Unsupported Applications and games to be installed.
Disadvantage Of Rooting The Redmi Note 8 Pro?
Here are some Disadvantages of Rooting Redmi Note 8 Pro
- If you root your Redmi Note 8 Pro, you will lose your Phone Warranty.
- You will not be able to receive System Updates from your phone manufacturer.
- If you miss any steps while rooting, your phone may become Completely Dead.
- You will not be able to install OTA Updates on your Redmi Note 8 Pro.
Pre-Requirements
- First, Fully charge your Redmi Note 8 Pro. If not, then there is a high risk of been stuck in between the process.
- Make sure your phone Bootloader is unlocked, you can follow our guide Here.
- Install a custom recovery like TWRP to flash files On Redmi Note 8 Pro.
- Also, Take Full Backup of your Redmi Note 8 Pro.
- This guide is only for rooting Redmi Note 8 Pro device. Do not try this method on any other smartphone. otherwise, your phone may become unusable and dead.
Now that you have learned about the advantages and disadvantages of rooting Redmi Note 8 Pro smartphone let’s straight jump into the process.
Let’s Root Redmi Note 8 Pro

Warning! All the Tutorials/ methods shown in this website are not tested for every smartphone.
If anything happens to your smartphone GuidetoRoot.com is not Responsible for any loss and damage to your smartphone. So, try these methods with your Own Risk!
Method #1: Root Redmi Note 8 Pro Using Magisk
Magisk root method is a very advanced and safest method. And the best part of this method is that you will receive the OTA update, and you will be able to use banking apps without any problems.
- First of all, download the latest Magisk App (Magisk Zip) file on your phone.
- Then rename the downloaded Magisk apk file extension .apk to .zip.
- Move the Magisk zip file to your phone’s internal storage.
- Make sure you have a Custom Recovery installed on your phone.
- Now Boot your Redmi Note 8 Pro to Recovery Mode by pressing Volume Down + Power Button at the same time until you see the Boot Animation.
- Tap on Install from the TWRP Recovery page.
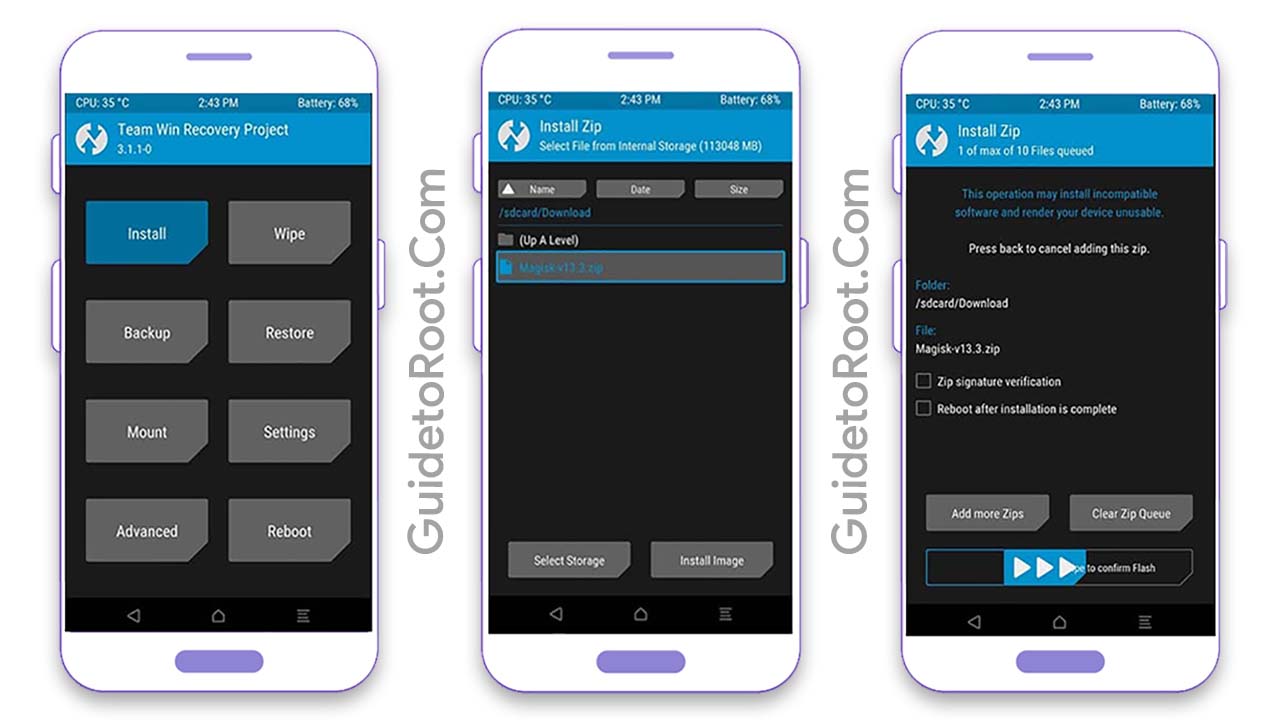
- Now locate Magisk.Zip file from your internal storage and select it.
- After Tap on Swipe To Confirm Flash.
- Then Next flash Lazy Flasher zip file, Otherwise, your phone will not boot.
- Now, Reboot your device.
- Once your phone boots up, install Magisk Manager APK.
- You have Successfully Rooted you Redmi Note 8 Pro device.
Must See: Root Poco M2 Pro
Method #2: Root Redmi Note 8 Pro By SuperSU
This method is the most commonly used Rooting method. For this method, we need TWRP recovery or any Custom recovery.
- First of all, download the latest SuperSU Zip file on your phone.
- Next, Move the SuperSU Zip file to your phone’s internal storage.
- Make sure you have a Custom Recovery installed on your phone.
- Now Boot your Redmi Note 8 Pro to Recovery Mode.
- Tap on Install from the TWRP recovery page.
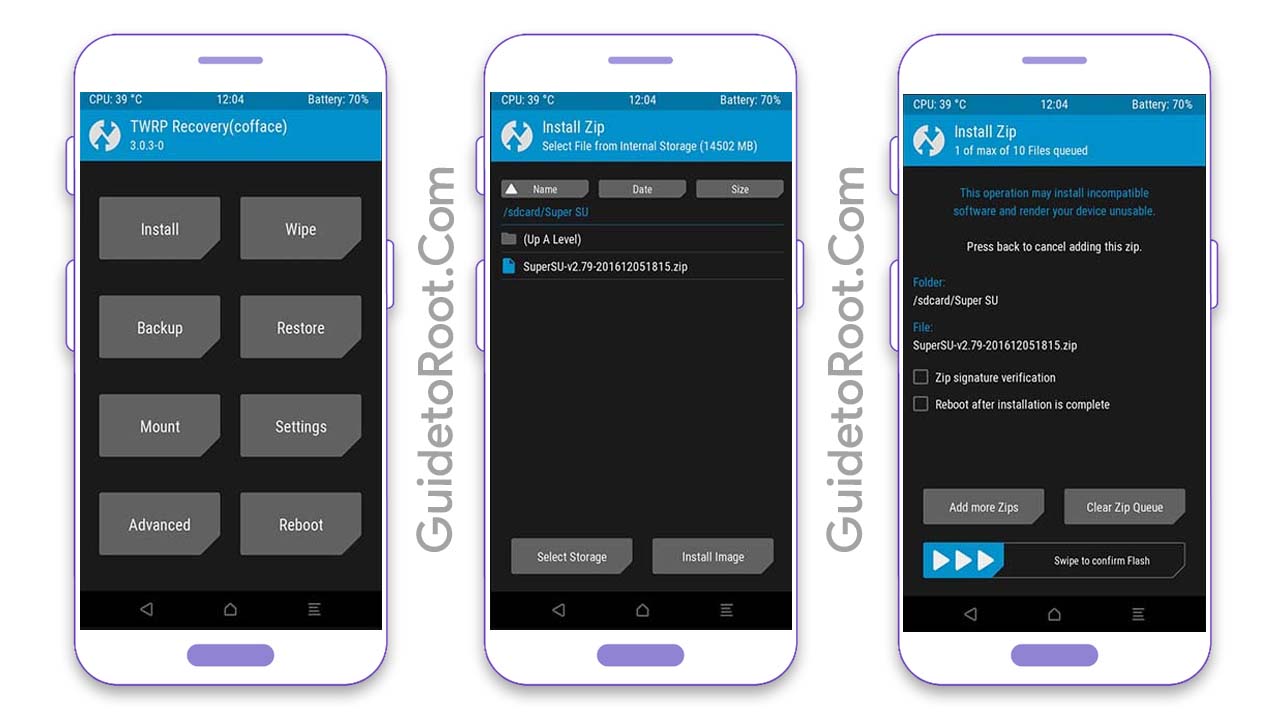
- Now locate the SuperSU Zip file from your internal storage.
- Select the Zip file and Swipe to Install.
- Then Next flash Lazy Flasher zip file, Otherwise, your phone will not boot.
- After the flashing process is complete, tap on the Reboot System.
- That’s it.
- You have Successfully Rooted your Redmi Note 8 Pro smartphone.
Must Read: Root Redmi 10X Pro
Method #3: Root Redmi Note 8 Pro By KingoRoot
If you are looking for a method in which there is no PC is requires then KingoRoot is the best option to Root Redmi Note 8 Pro without PC.
- First of all, you have to download the latest KingoRoot APK.
- After that, Go to Settings then Security and then Enable Unknown Source option.
- Install this APK file on your phone.
- Now open the Kingoroot App and tap on One Click Root button.
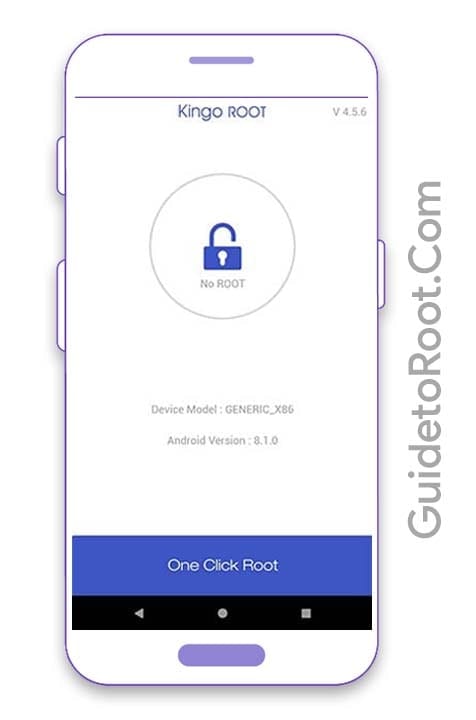
- Your phone may reboot several times, so do not panic.
- Wait a few minutes and let the process complete.
- That’s pretty much it 🙂
Must See: Root Redmi 9 Prime?
How to Check if Your Redmi Note 8 Pro Is Rooted Successfully or Not?
If you want to confirm the Root status and you want to check if your Redmi Note 8 Pro is Rooted successfully or not, follow the steps given below.
- First, download the Root Checker App from the Google Play Store.
- Then Open the app.
- After that, Click on “Verify Root”.
- Now, here you will see the message “Congratulations! Root access is properly installed on this device” if your device has been rooted successfully.
Must Read: Root Redmi 9 Without PC?
Conclusion:
So, I have shown you the complete Step-by-Step guide on how to Root Redmi Note 8 Pro smartphone. I hope you find this article useful and informative.
Which method do you want to try first with this guide?
If you have any doubts or questions related to this guide, do let me know in the comment section below, and I will try to resolve your issue as soon as possible.
Thank 🙂 you for reading this article until the end and don’t forget to share this article with your friends.
![Download Magisk App 27.0 and Magisk Zip 27.0 [LATEST 2024]](https://www.guidetoroot.com/wp-content/uploads/2020/12/Download-Magisk-Manager-and-Magisk-Zip-Latest-Version-250x150.jpg)